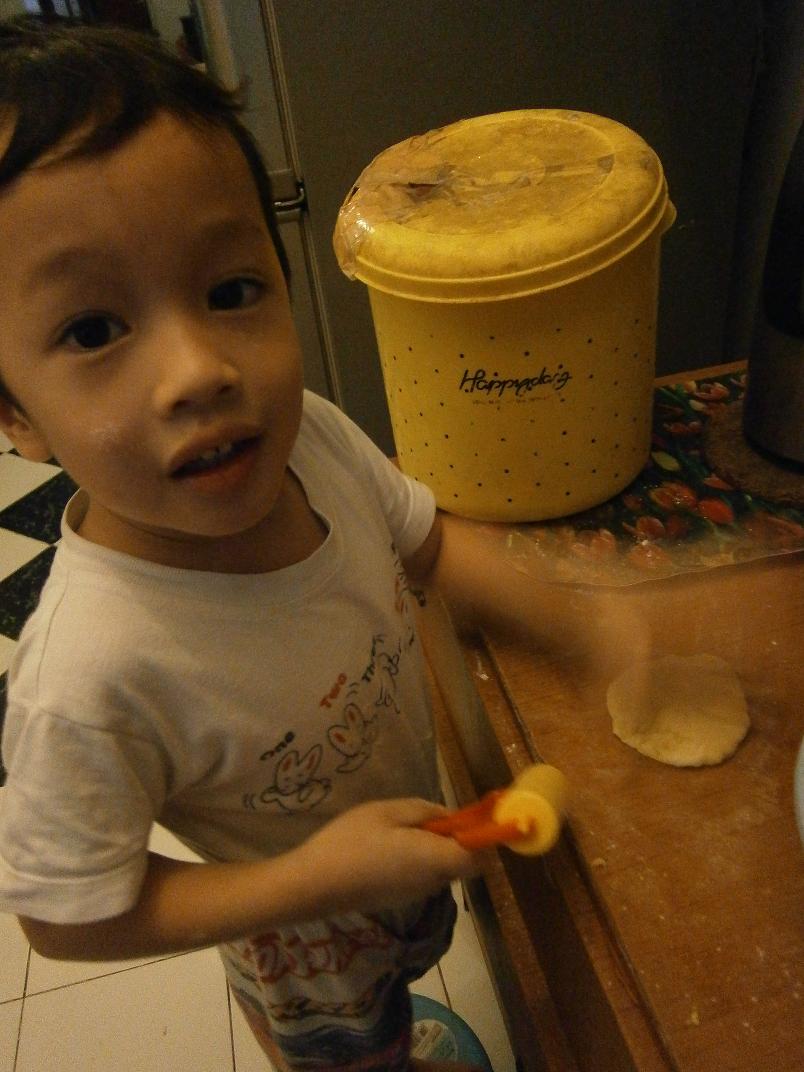
Yesterday, i was planning on making doughnut for our ta'jil.
Making doughnut just because it was the easiest snack to make (seriously, i can't cook or bake or anything related with kitchen..kitchen and I are like frenemies..i hate you but i need you that kind of relationship..;p)
And Mosha..he wanted to help me, so i decided to made him participate in process of making the dough.
Just like i expected..he was the one who more enthusiastic than myself about making the dough, he rolled his dough with his toy roller (i washed it first, not to worry), he smashed it, powder it with flour and he punched the dough to make its air popped.
Look at his face...
And here's our doughnut..not that special..it was just a plain old simple chocolate doughnut..but the process of making it was great..:)
Bon appetite..;p
Showing posts with label recipes. Show all posts
August 12, 2012
July 30, 2012
Fruity Smoothies
Satu lagi resep seger buat berbuka puasa...
Mmmhh..ngga langsung buat buka puasa juga sih..bisa keliyengan kalo langsung nyeruput smoothies yaa..hehehehe..tapi siapa tau bisa di jadiin minuman penutup atau dessert setelah makan berat.
Bikin smoothies sendiri yuukk..gampang banget caranya..
1. Keluarkan dan bersihkan blender kamu..hahahaha..
2. Potong -potong buah sesuai selera (saya disini pake nanas, stroberi, mangga, dan anggur tanpa biji..sebaiknya buah tidak dalam keadaan beku ya)
3. Blender
4. Siapin low fat yogurt atau low fat es krim (sesuai selera..tapi saya prefer non fat es krim..hihihihi..lebih kerasa tekstur kental smoothies-nya nanti)
5. Tuang 3 - 4 skup besar ke dalam blender kemudian blender lagi
6. Masukan es batu dan kemudian blender lagi. Konsistensi kekentalan tergantung selera yaaa..i like mine thick and sweet..:)
VOILA !
Jadi deh smoothies seger buat temen cemilan..jangan lupa untuk mencabut dan bersihin lagi blender kamu..i mean, really..sometimes this can be the worst part about making smoothies..;p
Mmmhh..ngga langsung buat buka puasa juga sih..bisa keliyengan kalo langsung nyeruput smoothies yaa..hehehehe..tapi siapa tau bisa di jadiin minuman penutup atau dessert setelah makan berat.
Bikin smoothies sendiri yuukk..gampang banget caranya..
1. Keluarkan dan bersihkan blender kamu..hahahaha..
2. Potong -potong buah sesuai selera (saya disini pake nanas, stroberi, mangga, dan anggur tanpa biji..sebaiknya buah tidak dalam keadaan beku ya)
3. Blender
4. Siapin low fat yogurt atau low fat es krim (sesuai selera..tapi saya prefer non fat es krim..hihihihi..lebih kerasa tekstur kental smoothies-nya nanti)
5. Tuang 3 - 4 skup besar ke dalam blender kemudian blender lagi
6. Masukan es batu dan kemudian blender lagi. Konsistensi kekentalan tergantung selera yaaa..i like mine thick and sweet..:)
VOILA !
Jadi deh smoothies seger buat temen cemilan..jangan lupa untuk mencabut dan bersihin lagi blender kamu..i mean, really..sometimes this can be the worst part about making smoothies..;p
July 26, 2012
Frozen Banana Pops
Let me just cut to the chase with you guys, you and your kids are going to love these pops. I know this because:
A) kids love anything on a stick
B) kids love rolling sticky stuff in other stuff
C) moms love healthy choices that are still fun
D) frozen pops are a summer essential
Bananas have some good nutrition (Vitamin C, Vitamin B6, Potassium, Magnesium) but they also taste great and are usually popular with the little people. The process may get a little messy, but your kids will love to play along.
It’s probably best for the parent to take charge of the popsicle sticks and spreading, but let the kids pick and add their own toppings. Children are crazy creative, maybe their combinations will surprise you!
The pops are meant to be frozen for a few hours before eating, but I wouldn’t blame you if you decided to eat them right away. It’s hard to wait patiently for a fun treat like this one. You can make them healthy enough for breakfast (cream cheese/yogurt with oats/nuts) or decadent enough for dessert (chocolate, chocolate, chocolate). Make it fun and make it your own.
Pictured in top photo, left to right: Peanut Butter with Oats/Granola and Chocolate Chips, Dark Chocolate with Sprinkles and Honey Cinnamon Cream Cheese with Cashews.
Pictured in bottom photo, left to right: Peanut Butter with Oats/Granola,Dark Chocolate with Coconut and Honey Cinnamon Cream Cheese with Graham Cracker Crumbs
Frozen Banana Pops
Ingredients:
1. bananas (small bananas will make 2 pops, large ones can make 3)
2. spread- cream cheese*, yogurt, dark chocolate**, peanut butter, Nutella, Biscoff, whatever you like!
3. toppings- oats, granola, chocolate chips, chopped nuts, crushed graham crackers, cookie crumbs, shredded coconut, sprinkles, chopped dried fruit, etc.
4. popsicle sticks
Directions :
1. Prepare a cookie sheet with a layer of parchment paper.
2. Peel bananas and cut off each end. Cut the bananas in half or thirds, depending on the size. Carefully insert a popsicle stick into the banana.
3. Using a knife, spread your desired topping onto the banana. (For melted chocolate, yogurt, or thinner spreads, dipping may be more practical.)
4. Roll the banana in your toppings (a shallow bowl or plate works well), using your hands to add more topping if your banana is curved. Place on the parchment paper. Repeat with remaining bananas.
5. Freeze the bananas for 2-4 hours. Serve or place in a freezer bag for up to a week.
additional notes
*Cream cheese must be very soft to spread onto the bananas, so make sure it is warm or room temperature. You can also doctor it up with honey and cinnamon for more flavor.
**To create a good dipping chocolate, add 1 tablespoon of coconut oil to each 3 oz of chocolate and heat until melted. This will create a hard shell when frozen.
Have a sweet snack time all..:)
A) kids love anything on a stick
B) kids love rolling sticky stuff in other stuff
C) moms love healthy choices that are still fun
D) frozen pops are a summer essential
Bananas have some good nutrition (Vitamin C, Vitamin B6, Potassium, Magnesium) but they also taste great and are usually popular with the little people. The process may get a little messy, but your kids will love to play along.
It’s probably best for the parent to take charge of the popsicle sticks and spreading, but let the kids pick and add their own toppings. Children are crazy creative, maybe their combinations will surprise you!
The pops are meant to be frozen for a few hours before eating, but I wouldn’t blame you if you decided to eat them right away. It’s hard to wait patiently for a fun treat like this one. You can make them healthy enough for breakfast (cream cheese/yogurt with oats/nuts) or decadent enough for dessert (chocolate, chocolate, chocolate). Make it fun and make it your own.
Pictured in top photo, left to right: Peanut Butter with Oats/Granola and Chocolate Chips, Dark Chocolate with Sprinkles and Honey Cinnamon Cream Cheese with Cashews.
Pictured in bottom photo, left to right: Peanut Butter with Oats/Granola,Dark Chocolate with Coconut and Honey Cinnamon Cream Cheese with Graham Cracker Crumbs
Frozen Banana Pops
Ingredients:
1. bananas (small bananas will make 2 pops, large ones can make 3)
2. spread- cream cheese*, yogurt, dark chocolate**, peanut butter, Nutella, Biscoff, whatever you like!
3. toppings- oats, granola, chocolate chips, chopped nuts, crushed graham crackers, cookie crumbs, shredded coconut, sprinkles, chopped dried fruit, etc.
4. popsicle sticks
Directions :
1. Prepare a cookie sheet with a layer of parchment paper.
2. Peel bananas and cut off each end. Cut the bananas in half or thirds, depending on the size. Carefully insert a popsicle stick into the banana.
3. Using a knife, spread your desired topping onto the banana. (For melted chocolate, yogurt, or thinner spreads, dipping may be more practical.)
4. Roll the banana in your toppings (a shallow bowl or plate works well), using your hands to add more topping if your banana is curved. Place on the parchment paper. Repeat with remaining bananas.
5. Freeze the bananas for 2-4 hours. Serve or place in a freezer bag for up to a week.
additional notes
*Cream cheese must be very soft to spread onto the bananas, so make sure it is warm or room temperature. You can also doctor it up with honey and cinnamon for more flavor.
**To create a good dipping chocolate, add 1 tablespoon of coconut oil to each 3 oz of chocolate and heat until melted. This will create a hard shell when frozen.
Have a sweet snack time all..:)
July 16, 2012
What's On My Pinterest Account
PINTEREST !!
Ssssoooooooooo much in love with this site..so many things that can be shared with your friends..and this site helps me a lot with something that i must admit it, organizing my favorite sites.
You just click a picture that you love and pin it to your virtual board. A simple as that.
Now i want to share a glimpse of my board so that maybe it will give you some inspirations..:)
Quirky Prints Board
Why do i name them quirky prints ? because they are all so unique from the fonts, typography, design, and the even the lines are eye catchy..:)
Sewing & Knitting Board
Everything related to sewing and knitting
Craft Room Board
Some ideas to beautify your craft room, perhaps ?
Yummy In My Tummy
Be careful..these recipes are gaining weight guarantee..;p
Okaaayyyyy..that was some of my boards on my pinterest account.
For more complete collections, just click here and be prepared to addicted to pinterest..just like me..:)
Happy pinning all..:)
Ssssoooooooooo much in love with this site..so many things that can be shared with your friends..and this site helps me a lot with something that i must admit it, organizing my favorite sites.
You just click a picture that you love and pin it to your virtual board. A simple as that.
Now i want to share a glimpse of my board so that maybe it will give you some inspirations..:)
Quirky Prints Board
Why do i name them quirky prints ? because they are all so unique from the fonts, typography, design, and the even the lines are eye catchy..:)
Sewing & Knitting Board
Everything related to sewing and knitting
Craft Room Board
Some ideas to beautify your craft room, perhaps ?
Yummy In My Tummy
Be careful..these recipes are gaining weight guarantee..;p
Okaaayyyyy..that was some of my boards on my pinterest account.
For more complete collections, just click here and be prepared to addicted to pinterest..just like me..:)
Happy pinning all..:)
March 03, 2012
Introducing..Nauli's Kitchen..
Nauli's Kitchen belongs to my dearly college friend Yuri.
When we went into college together, i didn't know that she loves to cook..if i know then, i'm willing to volunteer myself to be her taste-bud buddy..;p
That's Yuri with her gorgeous little angel, Alexa (Alexa is so pretty, i even tell Yuri to introduce her to Mosha..hihihi..)
Her cooks looks absolutely mouth watering, even though i haven't got any chance to try her cooks since she lives in Germany now with her family, but i'm sure from the picture that she posted..they are definitely a must try !
So if you have time to travel to Germany and a bit confused what to eat or longing for Indonesian dishes..give her a call, friends.
Nauli's Kitchen is just a call away..:)
When we went into college together, i didn't know that she loves to cook..if i know then, i'm willing to volunteer myself to be her taste-bud buddy..;p
That's Yuri with her gorgeous little angel, Alexa (Alexa is so pretty, i even tell Yuri to introduce her to Mosha..hihihi..)
Her cooks looks absolutely mouth watering, even though i haven't got any chance to try her cooks since she lives in Germany now with her family, but i'm sure from the picture that she posted..they are definitely a must try !
So if you have time to travel to Germany and a bit confused what to eat or longing for Indonesian dishes..give her a call, friends.
Nauli's Kitchen is just a call away..:)
October 05, 2011
Polenta Pizza
Haaaiiii..
Sudah pernah saya bilang kan kalo saya ngga terlalu suka masak memasak ? Saya berurusan dengan dapur (secara rutin) baru setelah saya menikah..dan sekarang setelah punya anak, mau ngga mau mesti bisa masak (walaupun ngga jago sama sekali) soalnya kasian banget ntar anak dan suami saya..mau makan apa kalo saya ngga bisa masak ?! Sebenernya suami saya lebih jago masak daripada saya..dan saya dengan amat senang hati kalo dia menawarkan diri untuk masak buat kami bertiga...hihihihi..berkuranglah kerjaan saya untuk hari itu..;p
Sejak Mosha udah masuk playgroup..saya mesti putar akal untuk nyiapin sarapan atau snack apa yang easy to cook tapi gizinya oke..dan ngga terlalu makan banyak waktu di dapur (Mosha suka protes kalo saya terlalu lama di dapur, katanya dia ngga ada yang nemenin main).
Akhirnya mesti kreatif bikin resep coba-coba dengan bahan yang gampang di beli..namanya Polenta Pizza. Ini bahannya cuma 3 macem..polenta, keju mozarella dan saus tomat dengan merek yang sesuai selera kita.
Ini dia langkah-langkah pembuatannya :
1. Siapin polentanya..cari yang sudah pre cooked dan potong beberapa slice sesuai selera.
2. Tambahkan saus tomat sesuai selera di atas polentanya...
3. Taburkan keju mozarella parut diatas saus tomat sebagai topping. Bisa juga tambahkan wortel parut atau sayuran lain supaya lebih bervariasi.
4. Masukan ke dalam oven selama 45 detik (yeess..detik bukan menit..) dan pizza siap dihidangkan.
So yummy tanpa mesti repot..:)
Sudah pernah saya bilang kan kalo saya ngga terlalu suka masak memasak ? Saya berurusan dengan dapur (secara rutin) baru setelah saya menikah..dan sekarang setelah punya anak, mau ngga mau mesti bisa masak (walaupun ngga jago sama sekali) soalnya kasian banget ntar anak dan suami saya..mau makan apa kalo saya ngga bisa masak ?! Sebenernya suami saya lebih jago masak daripada saya..dan saya dengan amat senang hati kalo dia menawarkan diri untuk masak buat kami bertiga...hihihihi..berkuranglah kerjaan saya untuk hari itu..;p
Sejak Mosha udah masuk playgroup..saya mesti putar akal untuk nyiapin sarapan atau snack apa yang easy to cook tapi gizinya oke..dan ngga terlalu makan banyak waktu di dapur (Mosha suka protes kalo saya terlalu lama di dapur, katanya dia ngga ada yang nemenin main).
Akhirnya mesti kreatif bikin resep coba-coba dengan bahan yang gampang di beli..namanya Polenta Pizza. Ini bahannya cuma 3 macem..polenta, keju mozarella dan saus tomat dengan merek yang sesuai selera kita.
Ini dia langkah-langkah pembuatannya :
1. Siapin polentanya..cari yang sudah pre cooked dan potong beberapa slice sesuai selera.
2. Tambahkan saus tomat sesuai selera di atas polentanya...
3. Taburkan keju mozarella parut diatas saus tomat sebagai topping. Bisa juga tambahkan wortel parut atau sayuran lain supaya lebih bervariasi.
4. Masukan ke dalam oven selama 45 detik (yeess..detik bukan menit..) dan pizza siap dihidangkan.
So yummy tanpa mesti repot..:)
September 23, 2011
Raspberry-Lemon Cheesecake
Ingredients
For the crust:
3/4 cup graham cracker crumbs
1 tablespoon sugar
3 tablespoons unsalted butter, melted
For the filling:
2/3 cup sugar
zest on 2 lemons
1 (8 ounce) package cream cheese, softened
2 teaspoons fresh lemon juice
1 teaspoon pure vanilla extract
1 (8 ounce) tub frozen whipped topping, thawed
1 cup fresh raspberries, slightly mashed with a fork
Directions
1. In a medium bowl, stir together the graham cracker crumbs and 1 tablespoon of sugar and melted butter. Evenly divide the crumbs between your individual serving dishes and press into the bottoms of the dishes to form a crust layer.
2. In a large bowl, mix together the sugar and lemon zest until the sugar becomes moist and fragrant. Add cream cheese and beat with an electric mixer until smooth. Add lemon juice and vanilla mixing to combine. Using a rubber spatula, fold in the whipped topping until well blended, then fold in the raspberries.
3. Evenly pipe or spoon the filling into individual serving dishes. Cover with plastic wrap and refrigerate for at least 2 hours before serving. If desired, garnish with fresh raspberries and a sprig of fresh mint.
Recipe Notes:
-If you make this into one pie, simply use pour the cream cheese mixture into a 9-inch graham cracker crust and chill for 3 hours before serving.
-This recipe tastes really delicious with blueberries and strawberries as well. Play around with different fruit combinations to create a wide range of flavors.
-I have not tried this recipe using fresh whipped cream, so I cannot attest to the results.
Recipe adapted from My Baking Addiction
For the crust:
3/4 cup graham cracker crumbs
1 tablespoon sugar
3 tablespoons unsalted butter, melted
For the filling:
2/3 cup sugar
zest on 2 lemons
1 (8 ounce) package cream cheese, softened
2 teaspoons fresh lemon juice
1 teaspoon pure vanilla extract
1 (8 ounce) tub frozen whipped topping, thawed
1 cup fresh raspberries, slightly mashed with a fork
Directions
1. In a medium bowl, stir together the graham cracker crumbs and 1 tablespoon of sugar and melted butter. Evenly divide the crumbs between your individual serving dishes and press into the bottoms of the dishes to form a crust layer.
2. In a large bowl, mix together the sugar and lemon zest until the sugar becomes moist and fragrant. Add cream cheese and beat with an electric mixer until smooth. Add lemon juice and vanilla mixing to combine. Using a rubber spatula, fold in the whipped topping until well blended, then fold in the raspberries.
3. Evenly pipe or spoon the filling into individual serving dishes. Cover with plastic wrap and refrigerate for at least 2 hours before serving. If desired, garnish with fresh raspberries and a sprig of fresh mint.
Recipe Notes:
-If you make this into one pie, simply use pour the cream cheese mixture into a 9-inch graham cracker crust and chill for 3 hours before serving.
-This recipe tastes really delicious with blueberries and strawberries as well. Play around with different fruit combinations to create a wide range of flavors.
-I have not tried this recipe using fresh whipped cream, so I cannot attest to the results.
Recipe adapted from My Baking Addiction
Fried Bocconcini with Spicy Tomato Sauce
Ingredients
For the sauce:
1/2 cup extra-virgin olive oil
2 garlic cloves, minced
1 tsp. red pepper flakes
1 can (28 oz.) crushed tomatoes, juice reserved
Salt and pepper, to taste
For the fried mozzarella:
3-4 cups peanut oil, depending on type of pan you will be frying the cheese in
1 teaspoon salt, plus more to taste
2 tablespoons grated Parmesan
2 lb. mozzarella bocconcini (about 50 pieces)
4 eggs
1/2 cup milk
2 cups all-purpose flour
4 cups panko
Special equipment: Deep-frying thermometer
Instructions
1. For the sauce: In a saucepan over medium heat, warm the 1/2 cup olive oil.
2. Add the garlic and red pepper flakes and cook, stirring, until the garlic is soft but not browned, about 1 minute.
3. Add the tomatoes and their juices and simmer until the sauce is thickened, about 6 minutes. Season with salt and black pepper. Set aside.
4. Preheat an oven to 200°F.
5. For the fried mozzarella: Drain the cheese from its liquid. Place the cheese on a paper towel-lined baking sheet and pat dry.
6. If your cheese balls seem pretty big, halve or quarter them into bite-size pieces. Once they get the panko breading on them, they will be a lot bigger.
7.In a bowl, whisk together the eggs and milk.
8. Put the egg mixture and bread crumbs in separate wide, shallow bowls. Combine the panko with the teaspoon of salt and Parmesan in another wide, shallow bowl. (*If you only have one shallow bowl, use it for the panko. It will help you immensely with the breading process.)
9. Roll the cheese in the flour, dip into the egg mixture and coat with the bread crumbs, shaking off the excess after each step.
10. Repeat the breading process one more time for each cheese piece.
11. In a large, deep sautĂ© pan over medium-high heat, pour the oil to a depth of 3 inches and heat to 350°F on a deep-frying thermometer.
12. Working in batches, fry the cheese until golden, about 45 seconds (or until golden brown-watch them carefully as oven temperatures may vary). If you notice that your thermometer’s reading decreases, wait for a little while until the oil gets back up to the proper temperature.
13. Transfer the fried cheese to a paper towel-lined plate and season with salt and black pepper. Place the cheese on a wire rack set over a baking sheet and keep warm in the oven while frying the remaining cheese.
14. Serve with the warm tomato sauce.
For the sauce:
1/2 cup extra-virgin olive oil
2 garlic cloves, minced
1 tsp. red pepper flakes
1 can (28 oz.) crushed tomatoes, juice reserved
Salt and pepper, to taste
For the fried mozzarella:
3-4 cups peanut oil, depending on type of pan you will be frying the cheese in
1 teaspoon salt, plus more to taste
2 tablespoons grated Parmesan
2 lb. mozzarella bocconcini (about 50 pieces)
4 eggs
1/2 cup milk
2 cups all-purpose flour
4 cups panko
Special equipment: Deep-frying thermometer
Instructions
1. For the sauce: In a saucepan over medium heat, warm the 1/2 cup olive oil.
2. Add the garlic and red pepper flakes and cook, stirring, until the garlic is soft but not browned, about 1 minute.
3. Add the tomatoes and their juices and simmer until the sauce is thickened, about 6 minutes. Season with salt and black pepper. Set aside.
4. Preheat an oven to 200°F.
5. For the fried mozzarella: Drain the cheese from its liquid. Place the cheese on a paper towel-lined baking sheet and pat dry.
6. If your cheese balls seem pretty big, halve or quarter them into bite-size pieces. Once they get the panko breading on them, they will be a lot bigger.
7.In a bowl, whisk together the eggs and milk.
8. Put the egg mixture and bread crumbs in separate wide, shallow bowls. Combine the panko with the teaspoon of salt and Parmesan in another wide, shallow bowl. (*If you only have one shallow bowl, use it for the panko. It will help you immensely with the breading process.)
9. Roll the cheese in the flour, dip into the egg mixture and coat with the bread crumbs, shaking off the excess after each step.
10. Repeat the breading process one more time for each cheese piece.
11. In a large, deep sautĂ© pan over medium-high heat, pour the oil to a depth of 3 inches and heat to 350°F on a deep-frying thermometer.
12. Working in batches, fry the cheese until golden, about 45 seconds (or until golden brown-watch them carefully as oven temperatures may vary). If you notice that your thermometer’s reading decreases, wait for a little while until the oil gets back up to the proper temperature.
13. Transfer the fried cheese to a paper towel-lined plate and season with salt and black pepper. Place the cheese on a wire rack set over a baking sheet and keep warm in the oven while frying the remaining cheese.
14. Serve with the warm tomato sauce.
August 20, 2011
Food Lust - Oreo Cupcakes
I really really really love cupcakes !
Small bite, small package but big yummy !
I always think that if we ate cupcakes then all of your miseries will be (temporary) gone.
Oreo Cupcakes
Recipe by Call Me Cupcake!
makes 24
1 stick (113 g) unsalted butter, at room temperature
1 cup milk
2 tsp vanilla extract
2 1/4 cups flour, plus 2 Tbsp for the Oreo chunks
1 tsp baking powder
1/2 tsp salt
1 2/3 cup sugar
3 large egg whites, at room temperature
1 pkg Oreo Cookies (~45 cookies)
Preheat over to 350F. Insert liners into a medium cupcake pan.
Twist apart 24 Oreos. Place the wafer with filling on it, filling side up, in the bottom of each paper liner. Cut other wafers in half. Save 24 halves to place in the frosting. Crush the other wafer halves, also for garnishing.
Cut the remaining Oreo cookies into quarters with a sharp knife. Toss with 2 Tbsp flour and set aside.
In a large bowl cream the butter until fluffy, about 3-5 minutes. Add the milk and vanilla and mix to combine.
In a separate bowl mix together the flour, baking powder, and salt.
Add the dry ingredients to butter mixture. Mix until integrated. Stir in sugar. With an electric mixer on low speed, beat for 30 seconds. Turn the mixer up to medium speed and beat for 2 minutes. Add the egg whites. Beat for 2 more minutes. Stir in the quartered cookies.
Fill the cupcake lines three-quarters full. Bake for about 20 minutes or until a toothpick inserted in the center of cupcakes comes out clean. Cool cupcakes in the pan.
Whipped cream cheese frosting
-300 grams of cream cheese
-3 dl heavy whipping cream
-1 teaspoon vanilla extract
-2 dl powdered sugar
Whip the cream in a large bowl. Mix cream cheese, powdered sugar and vanilla in a another bowl. Mix everything together and whip until smooth. If the frosting is too runny, put the bowl in the fridge for a while and it'll firm up.
Paradise on earth !
Small bite, small package but big yummy !
I always think that if we ate cupcakes then all of your miseries will be (temporary) gone.
Oreo Cupcakes
Recipe by Call Me Cupcake!
makes 24
1 stick (113 g) unsalted butter, at room temperature
1 cup milk
2 tsp vanilla extract
2 1/4 cups flour, plus 2 Tbsp for the Oreo chunks
1 tsp baking powder
1/2 tsp salt
1 2/3 cup sugar
3 large egg whites, at room temperature
1 pkg Oreo Cookies (~45 cookies)
Preheat over to 350F. Insert liners into a medium cupcake pan.
Twist apart 24 Oreos. Place the wafer with filling on it, filling side up, in the bottom of each paper liner. Cut other wafers in half. Save 24 halves to place in the frosting. Crush the other wafer halves, also for garnishing.
Cut the remaining Oreo cookies into quarters with a sharp knife. Toss with 2 Tbsp flour and set aside.
In a large bowl cream the butter until fluffy, about 3-5 minutes. Add the milk and vanilla and mix to combine.
In a separate bowl mix together the flour, baking powder, and salt.
Add the dry ingredients to butter mixture. Mix until integrated. Stir in sugar. With an electric mixer on low speed, beat for 30 seconds. Turn the mixer up to medium speed and beat for 2 minutes. Add the egg whites. Beat for 2 more minutes. Stir in the quartered cookies.
Fill the cupcake lines three-quarters full. Bake for about 20 minutes or until a toothpick inserted in the center of cupcakes comes out clean. Cool cupcakes in the pan.
Whipped cream cheese frosting
-300 grams of cream cheese
-3 dl heavy whipping cream
-1 teaspoon vanilla extract
-2 dl powdered sugar
Whip the cream in a large bowl. Mix cream cheese, powdered sugar and vanilla in a another bowl. Mix everything together and whip until smooth. If the frosting is too runny, put the bowl in the fridge for a while and it'll firm up.
Paradise on earth !
August 19, 2011
Food Lust - Prawn with Lemon Grass
Aaaaaarrrjjjhhhh..keliatannya profesional sekali ya judul resepnya...padahal kalo di bahasa indonesia-kan (sumpah..bahasa indonesianya ngawur banget..) bacanya Udang Bumbu Serai...aaahh..tapi tetep yummy kok ya kedengerannya..:)
Ini resep coba - coba...cobain yaaaa..
BAHAN :
2 sdm minyak goreng
5 butir bawang merah, iris tipis
3 siung bawang putih, iris tipis
2 buah cabe merah keriting, iris tipis
2 buah cabe hijau keriting, iris tipis
2 batang serai, iris tipis
350 gr udang
2 sdt kecap ikan
2 sdt tepung maizena
200 ml kaldu/air
4 sdm saos tomat
2 sdt gula pasir
1/2 sdt merica bubuk
1/4 sdt garam
1/2 sdm cuka
CARA MEMBUAT :
1. Panaskan minyak goreng, tumis bawang merah, bawang putih, cabe merah, cabe hijau dan serai hingga harum.
2. Masukkan udang, aduk sebentar hingga berubah warna.
3. Tambahkan kecap ikan dan tepung maizena yang sudah dilarutkan dengan kaldu/air. Aduk hingga kental.
Masukkan saos tomat, gula pasir, merica, garam, dan cuka. Didihkan.
4. Angkat dan sajikan.
Resep baru untuk buka puasa niihh..mudah2an cocok yaaaa..
Selamat Berbuka Puasa...:)
Ini resep coba - coba...cobain yaaaa..
BAHAN :
2 sdm minyak goreng
5 butir bawang merah, iris tipis
3 siung bawang putih, iris tipis
2 buah cabe merah keriting, iris tipis
2 buah cabe hijau keriting, iris tipis
2 batang serai, iris tipis
350 gr udang
2 sdt kecap ikan
2 sdt tepung maizena
200 ml kaldu/air
4 sdm saos tomat
2 sdt gula pasir
1/2 sdt merica bubuk
1/4 sdt garam
1/2 sdm cuka
CARA MEMBUAT :
1. Panaskan minyak goreng, tumis bawang merah, bawang putih, cabe merah, cabe hijau dan serai hingga harum.
2. Masukkan udang, aduk sebentar hingga berubah warna.
3. Tambahkan kecap ikan dan tepung maizena yang sudah dilarutkan dengan kaldu/air. Aduk hingga kental.
Masukkan saos tomat, gula pasir, merica, garam, dan cuka. Didihkan.
4. Angkat dan sajikan.
Resep baru untuk buka puasa niihh..mudah2an cocok yaaaa..
Selamat Berbuka Puasa...:)
Food Lust - Pasta Aglio Olio
This is another easy peasy recipe...kalo yang ini sih ngarang-ngarang sendiri takaran bumbunya..soalnya ini emang resep sendiri...hahahhaha...ngga ada pakem bumbu dan so far hasilnya so good..hehehehehe..
BAHAN :
2 lt air
300 gr spaghetti
2 sdm minyak zaitun
6 siung bawang putih, kupas, memarkan
3 bh cabe merah, iris bulat tipis.
400 gr udang pancet ukuran sedang, buang kepala dan kulitnya, sisakan ekor.
200 gr cumi potong melintang
1/k kg tuna
3 sdm peterseli, cincang
2 sdt garam
1/2 sdt merica bubuk
CARA MEMBUAT :
1. Panaskan air, rebus pasta sampai mateng al dente (matang, tapi ngga terlalu lembek). Angkat, tiriskan. Sisihkan.
2. Panaskan minyak zaitun, tumis bawang putih dan cabe rawit sampai harum. Msukkan udang, cumi-cumi, dan tuna. Aduk rata, masak sampai berubah warna.
3. Tambahkan peterseli, garam, dan merica bubuk, aduk rata, masak sampai matang.
4. Masukkan pasta, aduk sebentar hingga rata. Angkat, dan sajikan panas. Bisa juga tambah oregano secukupnya kalo suka..supaya lebih herbsy baunya..;p
Yummmmmmmmmyyyy....
BAHAN :
2 lt air
300 gr spaghetti
2 sdm minyak zaitun
6 siung bawang putih, kupas, memarkan
3 bh cabe merah, iris bulat tipis.
400 gr udang pancet ukuran sedang, buang kepala dan kulitnya, sisakan ekor.
200 gr cumi potong melintang
1/k kg tuna
3 sdm peterseli, cincang
2 sdt garam
1/2 sdt merica bubuk
CARA MEMBUAT :
1. Panaskan air, rebus pasta sampai mateng al dente (matang, tapi ngga terlalu lembek). Angkat, tiriskan. Sisihkan.
2. Panaskan minyak zaitun, tumis bawang putih dan cabe rawit sampai harum. Msukkan udang, cumi-cumi, dan tuna. Aduk rata, masak sampai berubah warna.
3. Tambahkan peterseli, garam, dan merica bubuk, aduk rata, masak sampai matang.
4. Masukkan pasta, aduk sebentar hingga rata. Angkat, dan sajikan panas. Bisa juga tambah oregano secukupnya kalo suka..supaya lebih herbsy baunya..;p
Yummmmmmmmmyyyy....
Food Lust - Rolade Makaroni
Nemu resep gampang banget di tabloid NOVA..hehehehe...buat yang males masak berat resepnya bisa ditiru niihh..
BAHAN :
2 sdm margarine
100 gr bawang bombay, cincang
200 gr ayam cincang
50 gr tepung terigu
150 ml susu cair
1 sdt gula pasir
1/2 sdt garam
1/2 sdt merica bubuk
1/4 sdt pala bubuk
250 gr makaroni panjang, rebus
6 lbr keju slice
4 bh sosis isi keju
PELENGKAP :
200 gr kentang goreng
50 gr brokoli, rebus
50 gr wortel, rebus
100 ml mayones
20 ml saos sambal
CARA MAMBUAT :
1. panaskan margarin, tumis bawang bombay sampai harum. Tambahankan ayam, aduk rata, masak sampai berubah warna.
2. Masukkan tepung terigu sambil di aduk rata, tuang susu, aduk rata. Bumbui dengan gula pasir, garam, merica bubuk, dan pala. Aduk rata.
3. Masukkan makaroni yang sudah direbus, aduk rata.
4. Ambil selembar plasti, susun campuran makaroni diatasnya. Letakkan keju lembaran dan sosis diatasnya, kemudian gulung hingga padat, ikat dengan tali kedua ujungnya. Lakukan hal yang sama pada semua adonan hingga habis.
5. Kukus rolade dalam dandang yang sudah dipanaskan, selama 30 menit atau sampai matang. Angkat dan dinginkan.
6. Potong - potong rolade dan sajikan bersama pelengkapnya.
Mosha loves it ! And so am i....:)
Bon Appetite !
BAHAN :
2 sdm margarine
100 gr bawang bombay, cincang
200 gr ayam cincang
50 gr tepung terigu
150 ml susu cair
1 sdt gula pasir
1/2 sdt garam
1/2 sdt merica bubuk
1/4 sdt pala bubuk
250 gr makaroni panjang, rebus
6 lbr keju slice
4 bh sosis isi keju
PELENGKAP :
200 gr kentang goreng
50 gr brokoli, rebus
50 gr wortel, rebus
100 ml mayones
20 ml saos sambal
CARA MAMBUAT :
1. panaskan margarin, tumis bawang bombay sampai harum. Tambahankan ayam, aduk rata, masak sampai berubah warna.
2. Masukkan tepung terigu sambil di aduk rata, tuang susu, aduk rata. Bumbui dengan gula pasir, garam, merica bubuk, dan pala. Aduk rata.
3. Masukkan makaroni yang sudah direbus, aduk rata.
4. Ambil selembar plasti, susun campuran makaroni diatasnya. Letakkan keju lembaran dan sosis diatasnya, kemudian gulung hingga padat, ikat dengan tali kedua ujungnya. Lakukan hal yang sama pada semua adonan hingga habis.
5. Kukus rolade dalam dandang yang sudah dipanaskan, selama 30 menit atau sampai matang. Angkat dan dinginkan.
6. Potong - potong rolade dan sajikan bersama pelengkapnya.
Mosha loves it ! And so am i....:)
Bon Appetite !
July 11, 2011
Food Lust - Firecracker Whoopie Pies
Just tried new recipe..
the original version is here.
the filling I just sort of put together.
Cream cheese, margarine, powdered sugar, hazelnut flavored cream, and coconut. And rolled in toasted coconut.
So yummy!
Yield: about 24-30 sandwich cookies
Ingredients:
For the cookies:
8 tbsp. unsalted butter, at room temperature
¾ cup sugar
1 large egg plus 1 large egg white
1 tsp. vanilla extract
2¼ cups all-purpose flour
1½ tsp. baking powder
¾ tsp. salt
½ cup milk
For the filling:
10 tbsp. unsalted butter, at room temperature
1¼ cups confectioners’ sugar, sifted
Pinch of salt
2 tsp. vanilla extract
1 tbsp. heavy cream
To finish:
Red and blue Pop Rocks (about 3 packages of each)
White jimmies or other sprinkles (optional)
Directions:
To make the cookies, preheat the oven to 350˚ F. Line two baking sheets with parchment paper or silicone baking mats. In the bowl of an electric mixer combine the butter and sugar. Beat on medium-high speed until light and fluffy, 2-3 minutes. Blend in the egg and egg white, scraping down the bowl between additions. Blend in the vanilla. In a medium bowl, combine the flour, baking powder, and salt; whisk to blend. With the mixer on low speed, beat in half of the dry ingredients, mixing just until incorporated. Mix in the milk. Beat in the remaining dry ingredients, just until incorporated.
Transfer the cookie batter to a pastry bag fitted with a large round tip (I used an Ateco #809). Pipe the batter into 1½-inch rounds onto the prepared pans, spacing them an inch or two apart. Bake 7-8 minutes, just until set. Let cool on the pan at least 10 minutes, then transfer to a wire rack to cool completely.
To make the filling, whip the butter on medium-high speed until smooth, about 30 seconds. Mix in the confectioners’ sugar and salt, and beat on medium-high speed until smooth, 1-2 minutes. Mix in the vanilla and heavy cream on low speed just until incorporated, then increase the speed to medium-high and whip for 4 minutes, stopping and scraping down the sides of the bowl once or twice. Transfer to a pastry bag fitted with a plain tip.
To assemble the cookies, match them up in pairs by size. Pipe a dollop of filling onto the flat side of one cookie of each pair, and sandwich the cookies together, pushing the filling to the edges. Place the Pop Rocks in small bowls (mix in white jimmies for contrast, if desired). Dip the edges of the cookies into the Pop Rocks so that they adhere to the frosting. Serve immediately.
the original version is here.
the filling I just sort of put together.
Cream cheese, margarine, powdered sugar, hazelnut flavored cream, and coconut. And rolled in toasted coconut.
So yummy!
Yield: about 24-30 sandwich cookies
Ingredients:
For the cookies:
8 tbsp. unsalted butter, at room temperature
¾ cup sugar
1 large egg plus 1 large egg white
1 tsp. vanilla extract
2¼ cups all-purpose flour
1½ tsp. baking powder
¾ tsp. salt
½ cup milk
For the filling:
10 tbsp. unsalted butter, at room temperature
1¼ cups confectioners’ sugar, sifted
Pinch of salt
2 tsp. vanilla extract
1 tbsp. heavy cream
To finish:
Red and blue Pop Rocks (about 3 packages of each)
White jimmies or other sprinkles (optional)
Directions:
To make the cookies, preheat the oven to 350˚ F. Line two baking sheets with parchment paper or silicone baking mats. In the bowl of an electric mixer combine the butter and sugar. Beat on medium-high speed until light and fluffy, 2-3 minutes. Blend in the egg and egg white, scraping down the bowl between additions. Blend in the vanilla. In a medium bowl, combine the flour, baking powder, and salt; whisk to blend. With the mixer on low speed, beat in half of the dry ingredients, mixing just until incorporated. Mix in the milk. Beat in the remaining dry ingredients, just until incorporated.
Transfer the cookie batter to a pastry bag fitted with a large round tip (I used an Ateco #809). Pipe the batter into 1½-inch rounds onto the prepared pans, spacing them an inch or two apart. Bake 7-8 minutes, just until set. Let cool on the pan at least 10 minutes, then transfer to a wire rack to cool completely.
To make the filling, whip the butter on medium-high speed until smooth, about 30 seconds. Mix in the confectioners’ sugar and salt, and beat on medium-high speed until smooth, 1-2 minutes. Mix in the vanilla and heavy cream on low speed just until incorporated, then increase the speed to medium-high and whip for 4 minutes, stopping and scraping down the sides of the bowl once or twice. Transfer to a pastry bag fitted with a plain tip.
To assemble the cookies, match them up in pairs by size. Pipe a dollop of filling onto the flat side of one cookie of each pair, and sandwich the cookies together, pushing the filling to the edges. Place the Pop Rocks in small bowls (mix in white jimmies for contrast, if desired). Dip the edges of the cookies into the Pop Rocks so that they adhere to the frosting. Serve immediately.
July 04, 2011
Food Lust - Quick and Easy Veggie Soup
I'm too lazy to cook for today..so i just mixed some ingredients and make them as a soup.
What an easy peasy meal..hehehehe...
Vegetable Soup (Non-Dairy)
This delicious vegetable soup is hearty, nutritious and spicy.
This vegetable soup recipe uses a non-dairy base for those who are lactose intolerant. When serving the vegetable soup into an individual bowl, cheese can be added for an enhanced flavor and texture if one’s diet allows for adding dairy.
Ingredients
2 tbs olive oil
1 sweet onion chopped
2 carrots sliced thinly
1 stalk celery sliced thinly
2 cups butternut squash chopped
2 fresh cloves garlic cut into small pieces
3 teaspoons tomato paste
32 ounces chicken or vegetable broth low-sodium
28 ounce can crushed tomatoes low-sodium
2 cups water cold
2 or more tbs. sugar depends on acid in tomatoes
3 tbs. kosher salt to personal taste
1/4 tsp. red pepper flakes for personal taste
1/4 tsp. chili powder optional
1 tsp. tarragon dried
1 tsp. thyme dried
1 tsp. basil dried
1 tsp. oregano dried
1. Prep your vegetables. Heat the olive oil in large soup pot on medium-high heat. Add the onions and stir with a wooden spoon. Add some of the Kosher salt at this time. When onions look softer, add carrots, celery and garlic and continue to stir.
2. Add the butternut squash. If the vegetable mixture is too dry, add a bit more olive oil and keep stirring. Add the tomato paste and slowly add the chicken broth and keep stirring. Add the crushed tomatoes and the cold water. Add the dried herbs and Kosher salt to taste.
3. Once the vegetable soup has come to a rolling boil, turn down the heat to the lowest setting and stir. Be sure to keep tasting the soup and add sugar and salt to bring flavor to your liking. Cook the soup on low for about thirty minutes.
Serve your vegetable soup with whole-grain chips or top with soup crackers. For those who want cheese, try Fontina or Gruyere.
Cheers...;p
What an easy peasy meal..hehehehe...
Vegetable Soup (Non-Dairy)
This delicious vegetable soup is hearty, nutritious and spicy.
This vegetable soup recipe uses a non-dairy base for those who are lactose intolerant. When serving the vegetable soup into an individual bowl, cheese can be added for an enhanced flavor and texture if one’s diet allows for adding dairy.
Ingredients
2 tbs olive oil
1 sweet onion chopped
2 carrots sliced thinly
1 stalk celery sliced thinly
2 cups butternut squash chopped
2 fresh cloves garlic cut into small pieces
3 teaspoons tomato paste
32 ounces chicken or vegetable broth low-sodium
28 ounce can crushed tomatoes low-sodium
2 cups water cold
2 or more tbs. sugar depends on acid in tomatoes
3 tbs. kosher salt to personal taste
1/4 tsp. red pepper flakes for personal taste
1/4 tsp. chili powder optional
1 tsp. tarragon dried
1 tsp. thyme dried
1 tsp. basil dried
1 tsp. oregano dried
1. Prep your vegetables. Heat the olive oil in large soup pot on medium-high heat. Add the onions and stir with a wooden spoon. Add some of the Kosher salt at this time. When onions look softer, add carrots, celery and garlic and continue to stir.
2. Add the butternut squash. If the vegetable mixture is too dry, add a bit more olive oil and keep stirring. Add the tomato paste and slowly add the chicken broth and keep stirring. Add the crushed tomatoes and the cold water. Add the dried herbs and Kosher salt to taste.
3. Once the vegetable soup has come to a rolling boil, turn down the heat to the lowest setting and stir. Be sure to keep tasting the soup and add sugar and salt to bring flavor to your liking. Cook the soup on low for about thirty minutes.
Serve your vegetable soup with whole-grain chips or top with soup crackers. For those who want cheese, try Fontina or Gruyere.
Cheers...;p
July 01, 2011
Food Lust - Orange Crackers
Helllloooo..udah 3 hari ngga nulis niihh..maklumlagi liburan dan kalo libur dengan toddler, agak susah cari waktu luang buat ME TIME. Heheheheheheeehee...
Weekend ini ngga kemana - mana sih..di rumah aja bantuin ibu saya masak (meskipun saya lebih tepat disebut sebagai tukang cicip daripada tukang masak..;p), main sama jagoan kecil saya yang udah mulai badung, Mosha. Tapi ngga seru juga ya kalo ngga bikin sesuatu.
Weekend ini saya mau posting resep aja deh...bukan resep yang susah kok..hadeeehhh..kalo susah sih say juga males bikinnya, karena saya bukan tipe ibu yang suka masak dengan berbagai bumbu ( that's why saya ngga begitu suka bikin masakan indonesia..sssoorriii..hihihihihi..too much ingredients..)
Mosha suka banget makan cemilan..walaupun dia kalo makan nasi juga banyak, tapi ngga tau kenapa minggu ini dia lagi musuhan sama nasi.
Jadi saya mau bikinin cemilan yang sekiranya dapat merangsang nafsu makannya supaya balik normal lagi.
Main ingredient-nya jeruk Sunkist yang gampang di beli di supermarket atau hypermart dis ekitar rumah.
Kita bikin Zesty Orange Crackers yyuuuuukkk..gampang banget bikinnya..hasil browsing dari internet..maarriiii..
Zesty Orange Crackers
Ingredients:
3 Sunkist Valencia oranges, segmented and zested
20 cherry tomatoes, halved
1 lb. tub Bocconcini mozarella
1.4 cup Opal 9purple) basil, shredded into small pieces
10 whole wheat crackers
salt to taste
1/4 cup fresh rosemary
1/4 fresh tyme
1/8 cup fresh oregano
1 1/2 cups extra virgin olive oil
1 Tbsp. black pepper
Instructions: (makes 10 servings)
- Cut the Bocconcini into halves.
- Zest the Valencia oranges using a micro plane or fine grater and set aside. To segment the oranges, cut off the top and bottom.
- Lay the orange on a flat surface. using a pairing knife remove the skin and white pith. Carefully cut and release each segment from between the membranes and set aside.
- In a blender, add the olive oil, orange zest, and fresh herbs. Pulse until blended, continue to blend on medium speed until the herbs and zest are finely chopped, add the pepper and pulse quickly. Pour into a jar or plastic container. Leftover oil can be kept refrigerated for up to one month and used as a marinade for fish, poultry, or vegetables.
- Toss the oranges segments, cherry tomatoes, Bocconcini and basil lightly with 3/4 cup of orange scented herb oil and season with salt.
- To serve: Top each cracker with the mixture and serve.
Karena lagi males..jd fotonya cm pas hasil jadinya aja..hehehehe...
Bon Appetite...:)
Weekend ini ngga kemana - mana sih..di rumah aja bantuin ibu saya masak (meskipun saya lebih tepat disebut sebagai tukang cicip daripada tukang masak..;p), main sama jagoan kecil saya yang udah mulai badung, Mosha. Tapi ngga seru juga ya kalo ngga bikin sesuatu.
Weekend ini saya mau posting resep aja deh...bukan resep yang susah kok..hadeeehhh..kalo susah sih say juga males bikinnya, karena saya bukan tipe ibu yang suka masak dengan berbagai bumbu ( that's why saya ngga begitu suka bikin masakan indonesia..sssoorriii..hihihihihi..too much ingredients..)
Mosha suka banget makan cemilan..walaupun dia kalo makan nasi juga banyak, tapi ngga tau kenapa minggu ini dia lagi musuhan sama nasi.
Jadi saya mau bikinin cemilan yang sekiranya dapat merangsang nafsu makannya supaya balik normal lagi.
Main ingredient-nya jeruk Sunkist yang gampang di beli di supermarket atau hypermart dis ekitar rumah.
Kita bikin Zesty Orange Crackers yyuuuuukkk..gampang banget bikinnya..hasil browsing dari internet..maarriiii..
Zesty Orange Crackers
Ingredients:
3 Sunkist Valencia oranges, segmented and zested
20 cherry tomatoes, halved
1 lb. tub Bocconcini mozarella
1.4 cup Opal 9purple) basil, shredded into small pieces
10 whole wheat crackers
salt to taste
1/4 cup fresh rosemary
1/4 fresh tyme
1/8 cup fresh oregano
1 1/2 cups extra virgin olive oil
1 Tbsp. black pepper
Instructions: (makes 10 servings)
- Cut the Bocconcini into halves.
- Zest the Valencia oranges using a micro plane or fine grater and set aside. To segment the oranges, cut off the top and bottom.
- Lay the orange on a flat surface. using a pairing knife remove the skin and white pith. Carefully cut and release each segment from between the membranes and set aside.
- In a blender, add the olive oil, orange zest, and fresh herbs. Pulse until blended, continue to blend on medium speed until the herbs and zest are finely chopped, add the pepper and pulse quickly. Pour into a jar or plastic container. Leftover oil can be kept refrigerated for up to one month and used as a marinade for fish, poultry, or vegetables.
- Toss the oranges segments, cherry tomatoes, Bocconcini and basil lightly with 3/4 cup of orange scented herb oil and season with salt.
- To serve: Top each cracker with the mixture and serve.
Karena lagi males..jd fotonya cm pas hasil jadinya aja..hehehehe...
Bon Appetite...:)
Subscribe to:
Posts (Atom)